With Windows 11 shaping up to be the worst version of Windows so far, and actual spyware being packaged and marketed as a feature, I've had multiple conversations about switching to linux. Here's my guide for it. It'll be easy, and it'll do all the things that Windows does. For this guide, I won't be going through every option that you have, just one way to install linux.
This step is probably the hardest part. If you're completely new to linux, you'll need to check to make sure that you can do everything you need. There's two components to this: hardware compatibility and software compatibility.
The first thing to check is hardware compatibility. If you have a desktop computer, there's a better than 90% chance that linux will work just fine. If you use ethernet instead of wifi, that's a 100% chance. When you boot up the linux live iso in a little while, you'll find out if your wifi card is supported. If it is, you can proceed. If it isn't, then you can try troubleshooting and fixing it or you can buy a wifi extender with an ethernet cable. For laptops, compatibility is easier to find but harder to guarantee. Google "(your laptop model) linux compatibility" and read what others have to say. Like with desktops, the sticking point is most likely to be your wifi card. Fixing hardware incompatibility is beyond the scope of this guide.
For software, you'll need to check whether the programs you need can work within linux. Almost every program can, but certain things like business or school programs are typically restricted to Windows only. If it's a basic personal computer and you mostly use it for simple stuff like web browsing and watching movies, you have nothing to worry about. Some software has linux equivalents that can be used as well. For example, MS Office doesn't work very well on linux, but Only Office, Open Office, and Libre Office are all valid alternatives.
Prior to installing linux you should back up all sensitive and important data. Any photos, videos, memes, papers, and so on that you cannot afford to lose should be put on a separate drive and physically removed from the computer. This isn't a guide about backup practices but putting a copy on google drive or something might also be wise. When you install linux you'll either be deleting a portion of Windows or you'll be wiping the drive entirely. Things can happen. Copy the data elsewhere to make sure you have a copy that can't get destroyed when you do this.
The first thing to do is download two things: the linux iso, and balenaEtcher.
Linux is fragmented into hundreds of different distributions, called 'distros'. They can be thought of as different types of hammers. They have the same basic shape and they do the same basic thing, but different hammers are better at different things. In the same way, all linux distros derive from the same 'shape', but are better at different things.
For this guide we'll be using EndeavourOS. It is a derivative of Arch Linux. You might have heard memes of Arch being difficult to use, requiring a lot of experience. Those are just memes, don't worry about them. You don't need to know the specific details about EndeavourOS right now. We're not here to do the most optimal thing, we're here to just get linux working. As you grow in experience and knowledge you can make your own informed decisions about which distro to use.
The other thing we need is balenaEtcher. This is the tool we use to put linux on the usb drive. It's available on Mac, Linux, and Windows (although if you're on linux just use dd).
Go to the EndeavourOS website and click "Download". If you have a bittorrent client, then the magnet and torrent link are right at the top. Otherwise, scroll down to your country and click the "Download" button under the ISO column. Download balenaEtcher as well.

After both are downloaded, fire up balenaEtcher. Click "Flash from file" and then the EndeavourOS.iso file we downloaded earlier. Then click "Select target" and select the usb drive. Make sure that it's actually the usb drive and not another drive. Then click "Flash" and the process will start. Once it's done, you have succeeded in creating a linux live usb.
Shut down your computer and then start it up. As it starts, you'll have to spam a key to get to the boot menu. This is where you'll select what drive to start the computer from. It may be F12, it may be esc, it may be F8. There should be a list somewhere right after your computer starts, just spam that key. When you get into the boot menu, select the usb drive that you just made.

Just press enter here, selecting "EndeavourOS default", and wait for it to finish loading.

Play around here for awhile. Go browse some webpages, check the wifi. Get used to the look and feel of it. You can spend a couple days here if you want getting used to it. When you're ready, open that first window that popped up and click "Start the installer". Choose online installation. Choose your timezone. Choose your keyboard layout (QWERTY unless you know better). Pick "Plasma KDE" for the desktop. Leave the default packages, which is the next screen, and just hit next. Select Grub bootloader, which is enabled by default.
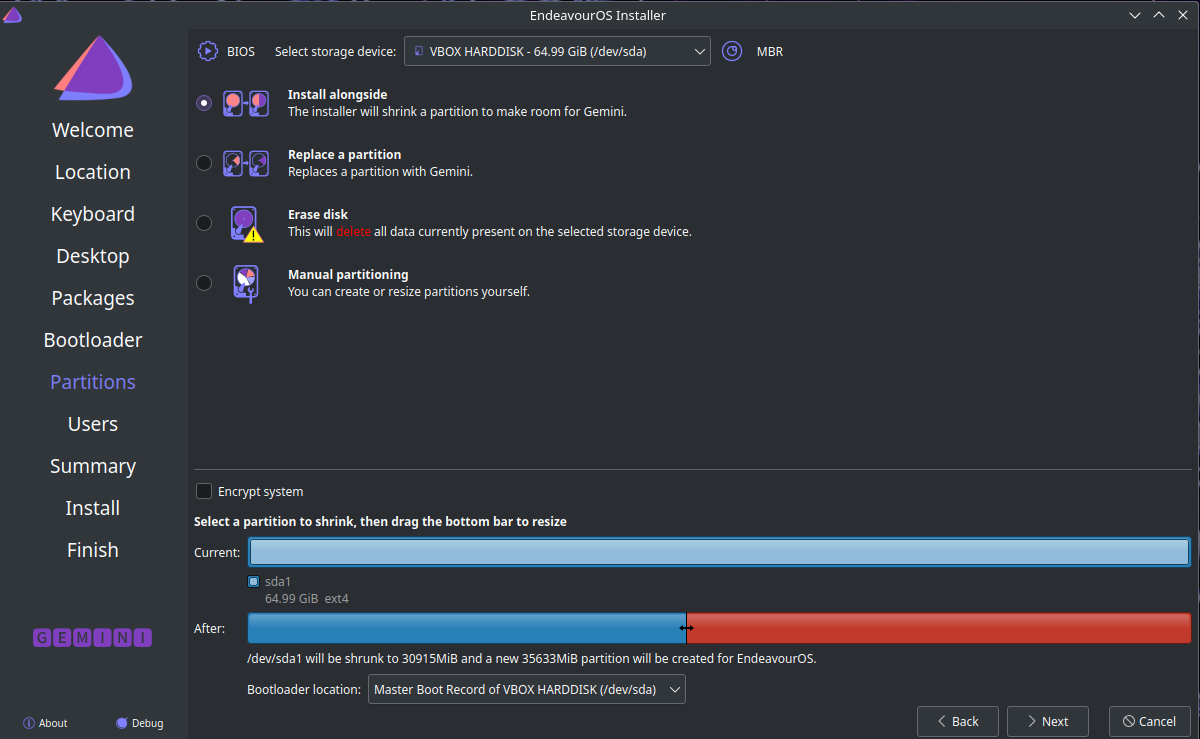
The next screen is partitioning.
This is the important part.
Partitioning separates your hard drive into different sections, one of which we're going to turn into your linux drive.
If you want to keep your Windows partition, which I recommend for now, select "Install alongside".
Leave 'encrypted' unchecked, as it is by default.
Click the top bar at the bottom to select the entire partition, and then drag the slider to about halfway.
Windows may have a couple partitions; select the biggest partition instead.
If you have very little storage (like 128gb or something), allocate at least 20gb.
If you have more than that, just go halfway.

The next screen is personal details, just fill them out how you want.
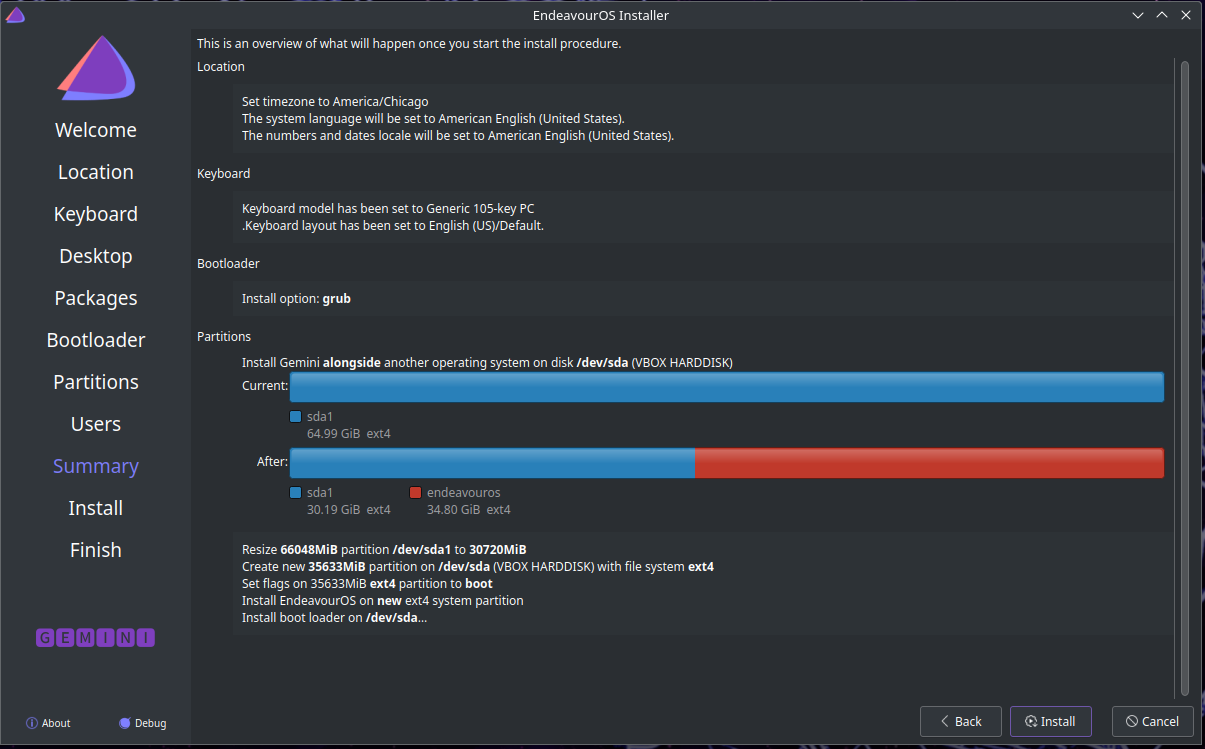
The following screen is confirming your installation details. It should look like the following:

Hit install and let the system work. It may take awhile. After it's done, restart. It should boot into grub, where you can select Windows or Linux.
That's pretty much it. Congratulations.