How to make your own website
This is a condensed guide to making your own website, using nothing but the most basic of tools.
I'm going to walk you through every step, with pictures.
We won't be using services like wordpress or github, and we won't be doing anything complex in terms of creating pages.
The website you make will be very simple and very, very quick to load.
You can poke around on my own website to get an idea of what the result will be, although obviously the styling can and will be different.
A word on opsec
This website will be publically accessible and available.
Google will index it, and it will be archived on things such as the wayback machine.
Anything you put on here can be viewed not only by normal people, but crazies who have the skills to dig.
It may sound paranoid or delusional, but it is always a good idea to assume that one of those crazies will eventually try to dig and see what they can find.
Keep that in mind when deciding what information to put up.
Never use your real name.
Never identify your location.
Never post pictures of yourself, or pictures that could be used to locate you.
If you post pictures, strip the EXIF data so that the metadata, such as GPS coordinates, cannot be found.
Most social media automatically does this, but for this website you will have to do it manually.
What you need
- OpenSSH
- some vim and/or nano experience
That's it.
I always advocate for using Linux, but there are options for Windows and Chromebook as well.
For linux, install OpenSSH using your package manager.
For Windows, see here.
For Chromebooks, see here.
Installing OpenSSH is beyond the scope of this tutorial because it's system-dependent, but if you're technologically savvy enough to be interested in creating a website this way then you should be savvy enough to install it on your own.
Part 1: Purchasing domain name
The very first step is that you need a domain name.
If you didn't already know, every website you've ever been to has an IP address, which is the address that your server lives at.
Trying to remember 45.76.234.160 is very hard for humans to do, so instead we use domain names, which are the things that you type into the URL bar.
The domain name is then pointed at your server's IP address.
There's more to it than that, but for the purposes of this tutorial its a 'good enough' understanding.
So you need a website name, basically.
The first step to getting it is to sign up on a domain registration website.
For this tutorial, we'll use Namecheap
So go ahead and make an account.
Once that's done, you'll be presented with the dashboard.
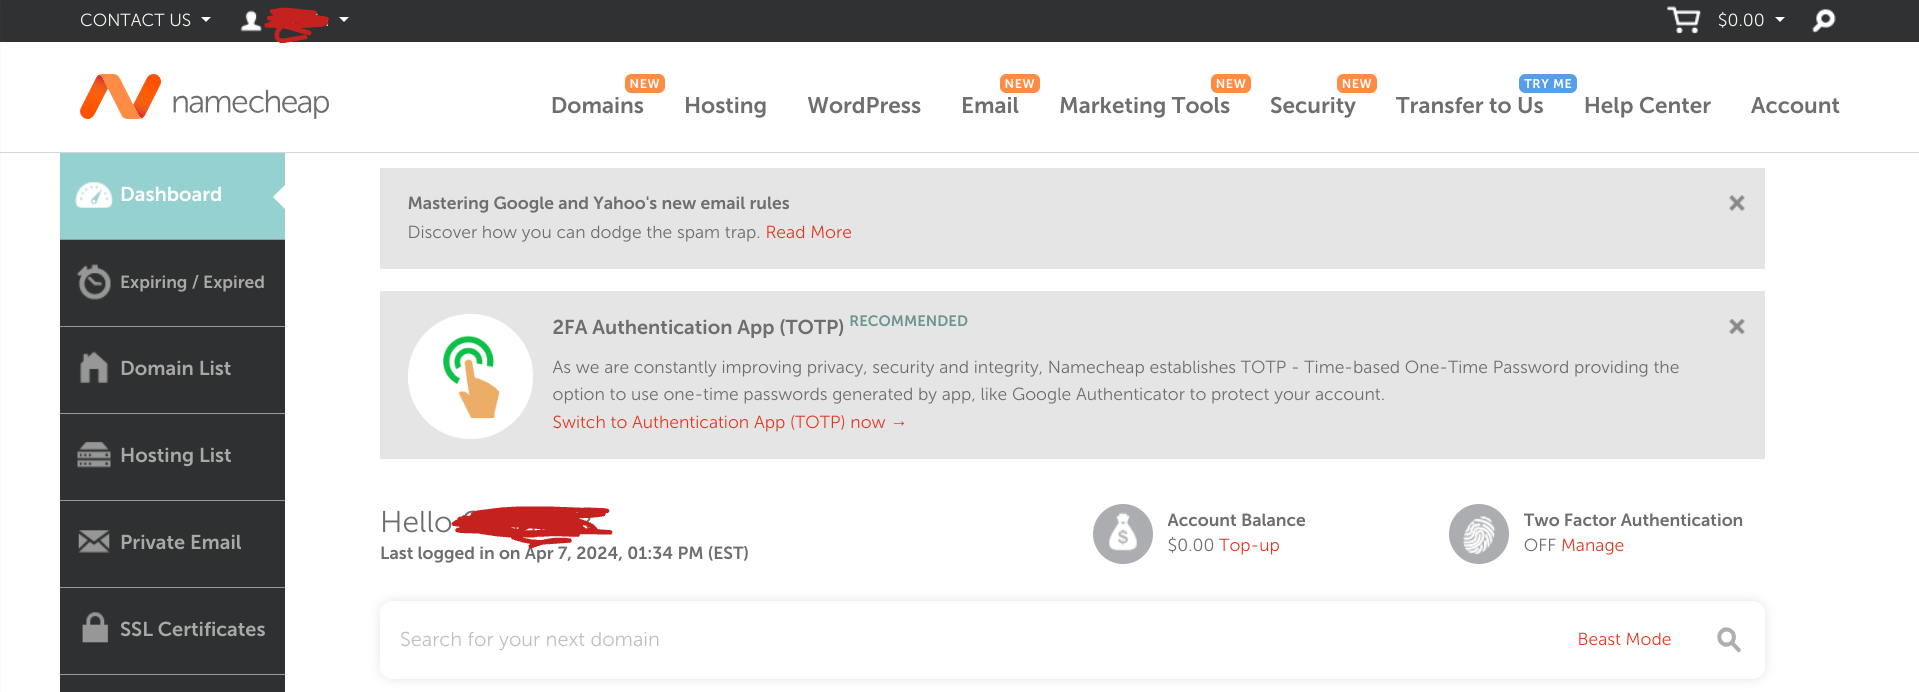
You can search for your domain name from there.
If it's for a specific project, then name it after that project.
If it's a more general website, then now's a great time to make up a pseudonym.
You might have seen websites that are organized like "blog.website.com" and "products.website.com".
What you're looking for is the 'website.com' part of that.
The "blog." and the "products." part are subdomains that can be set later;
All you need right now is the actual domain, so search for that.
For this tutorial, I chose "leefischer"
So, I search for "leefischer" to see my options.
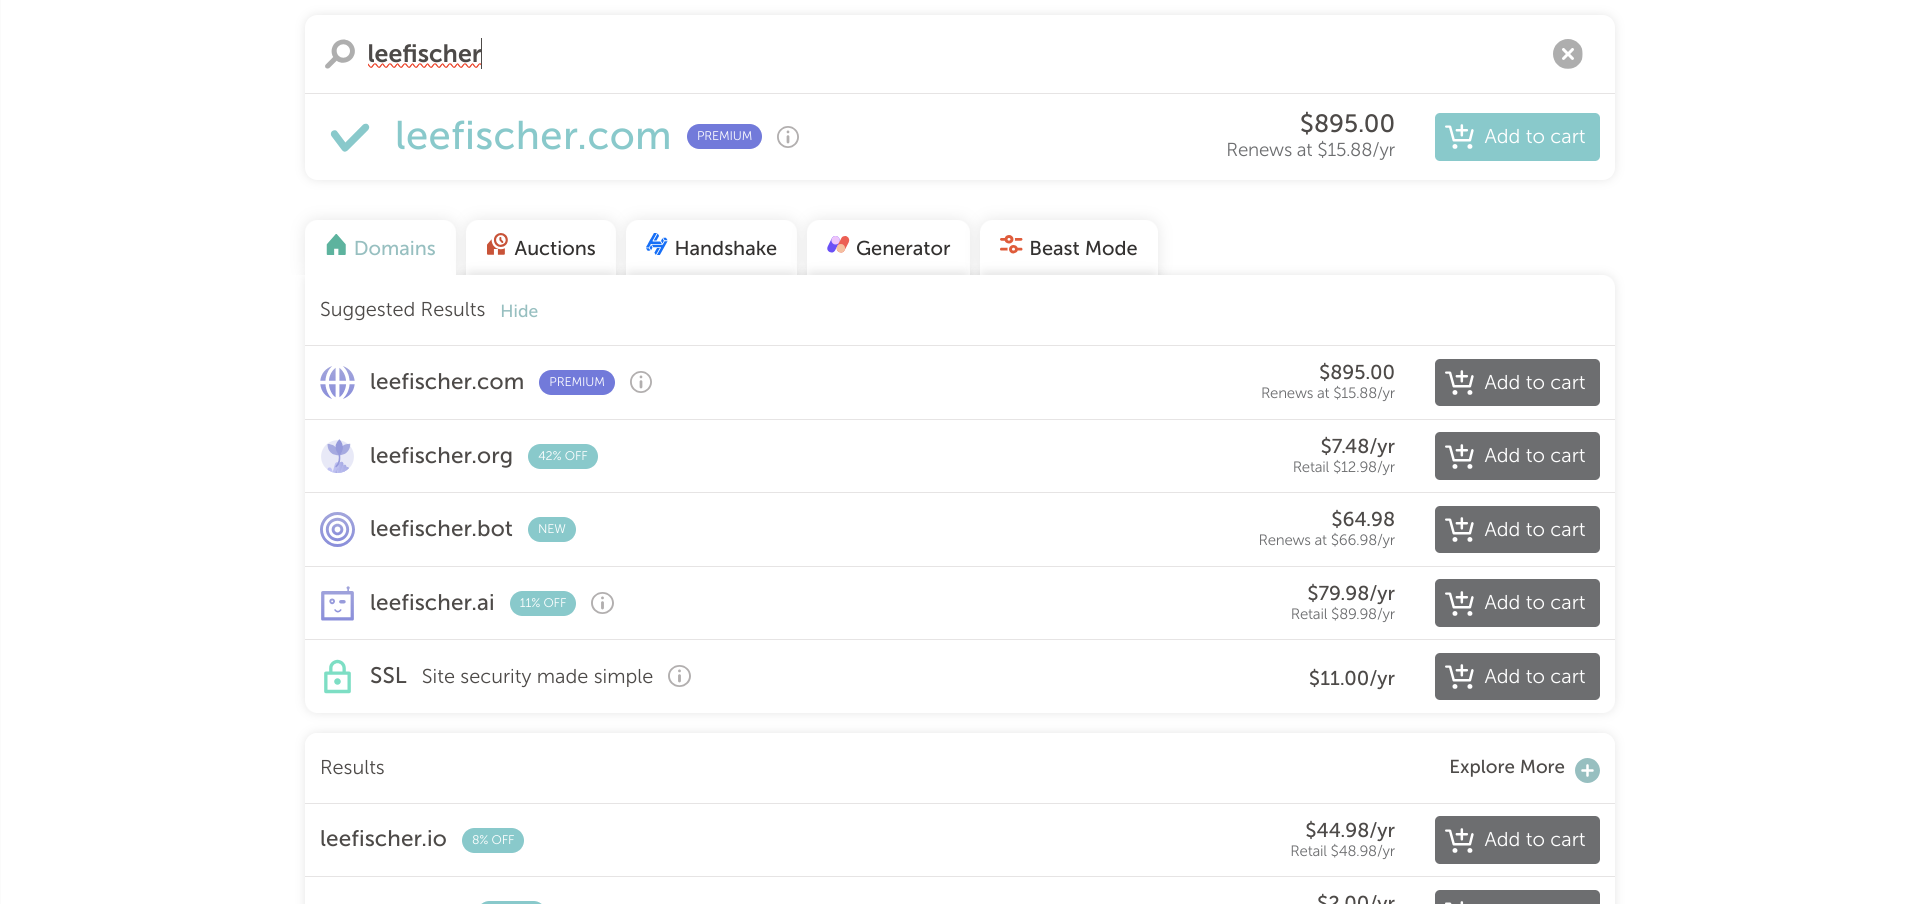
The last 3 letters in a domain name is called a Top Level Domain, or TLD.
Some TLDs are restricted;
For example, .gov is restricted to government websites only.
.xyz is a fairly common TLD for personal websites.
It was created in 2014, so usually the domain name you want hasn't been taken yet.
There is no restriction for them, and they're usually fairly cheap, so that's what I choose to go for.
When you find a domain name that you like, add it to the cart.
Ignore all of the other options that will pop up, you won't need them right now.
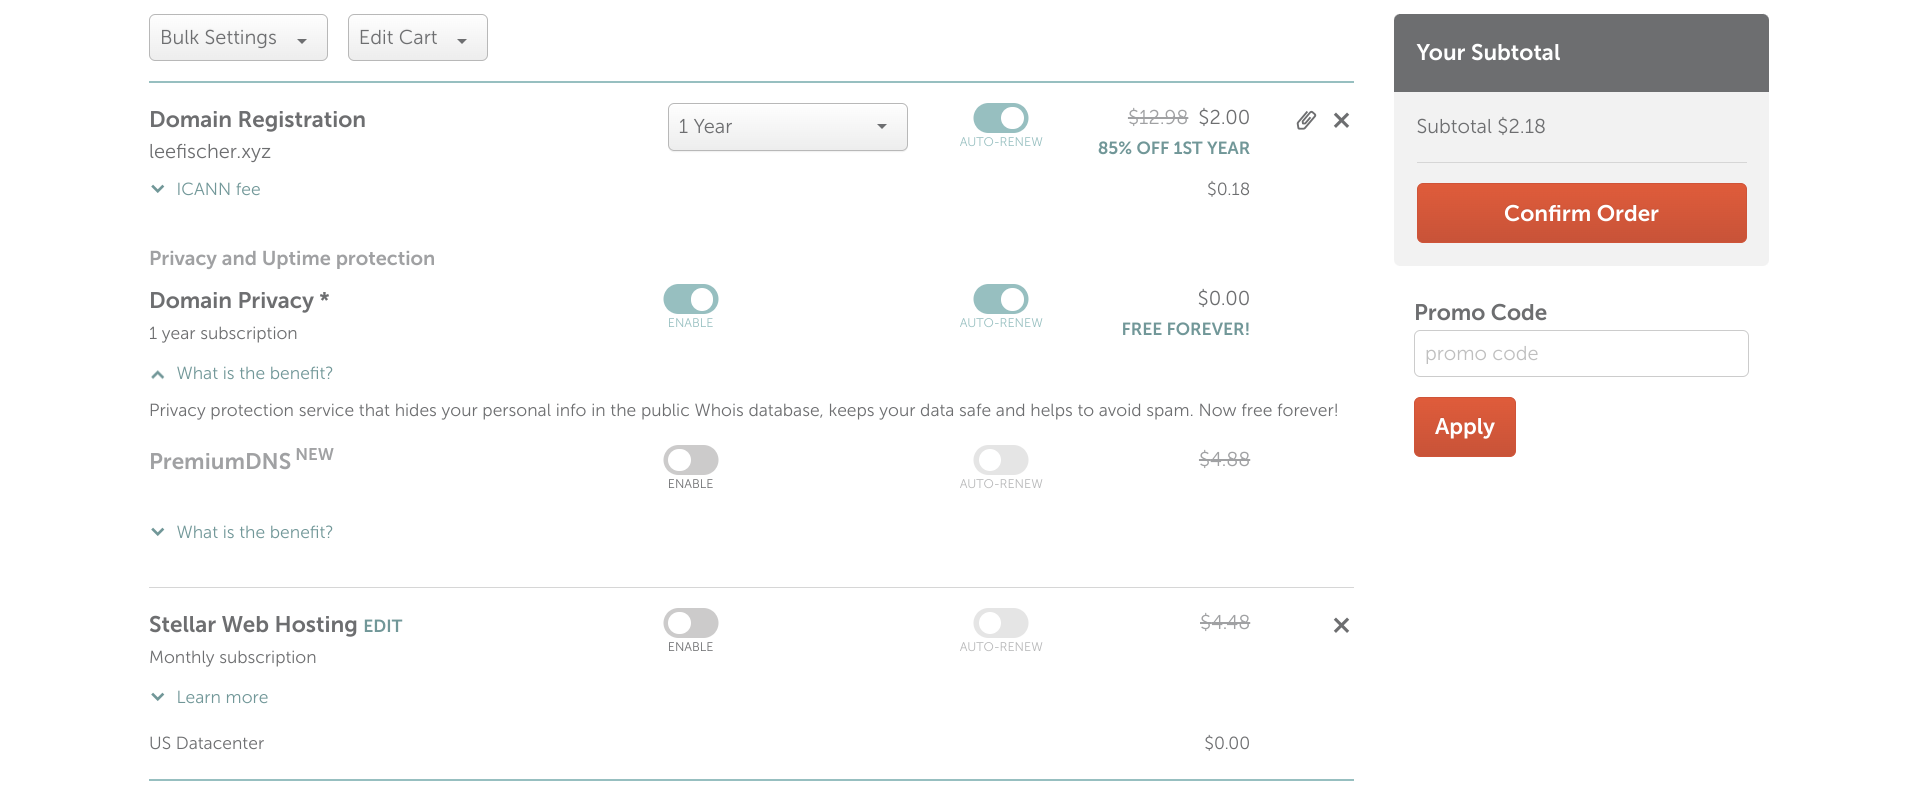 Go to the cart, and make sure that "Domain Privacy" is selected.
It's free, and it means that all of the personal information you gave when you signed up will remain private.
Confirm order, and pay for it.
After the payment goes through, you'll see a button to manage the new domain name.
Click it, and leave that tab open.
That's it on Namecheap for now, so let's go get our server set up.
Part 2: Purchasing a server
Now we need a server to host our website.
A server is the actual computer that hosts all of your content, like the actual html pages that you put up.
For that, we'll use Vultr, which offers Virtual Private Servers.
VPSes are tiny slices of huge computers, which are isolated from the whole.
They have their own IP addresses and resources devoted to them, like storage space and RAM.
We're going to buy a VPS and then point our domain name at it.
So sign up for Vultr, and then you'll be presented with another dashboard.
In the top right corner, there's a big blue button that says "Deploy".
Mouse over it and click "Deploy new server".
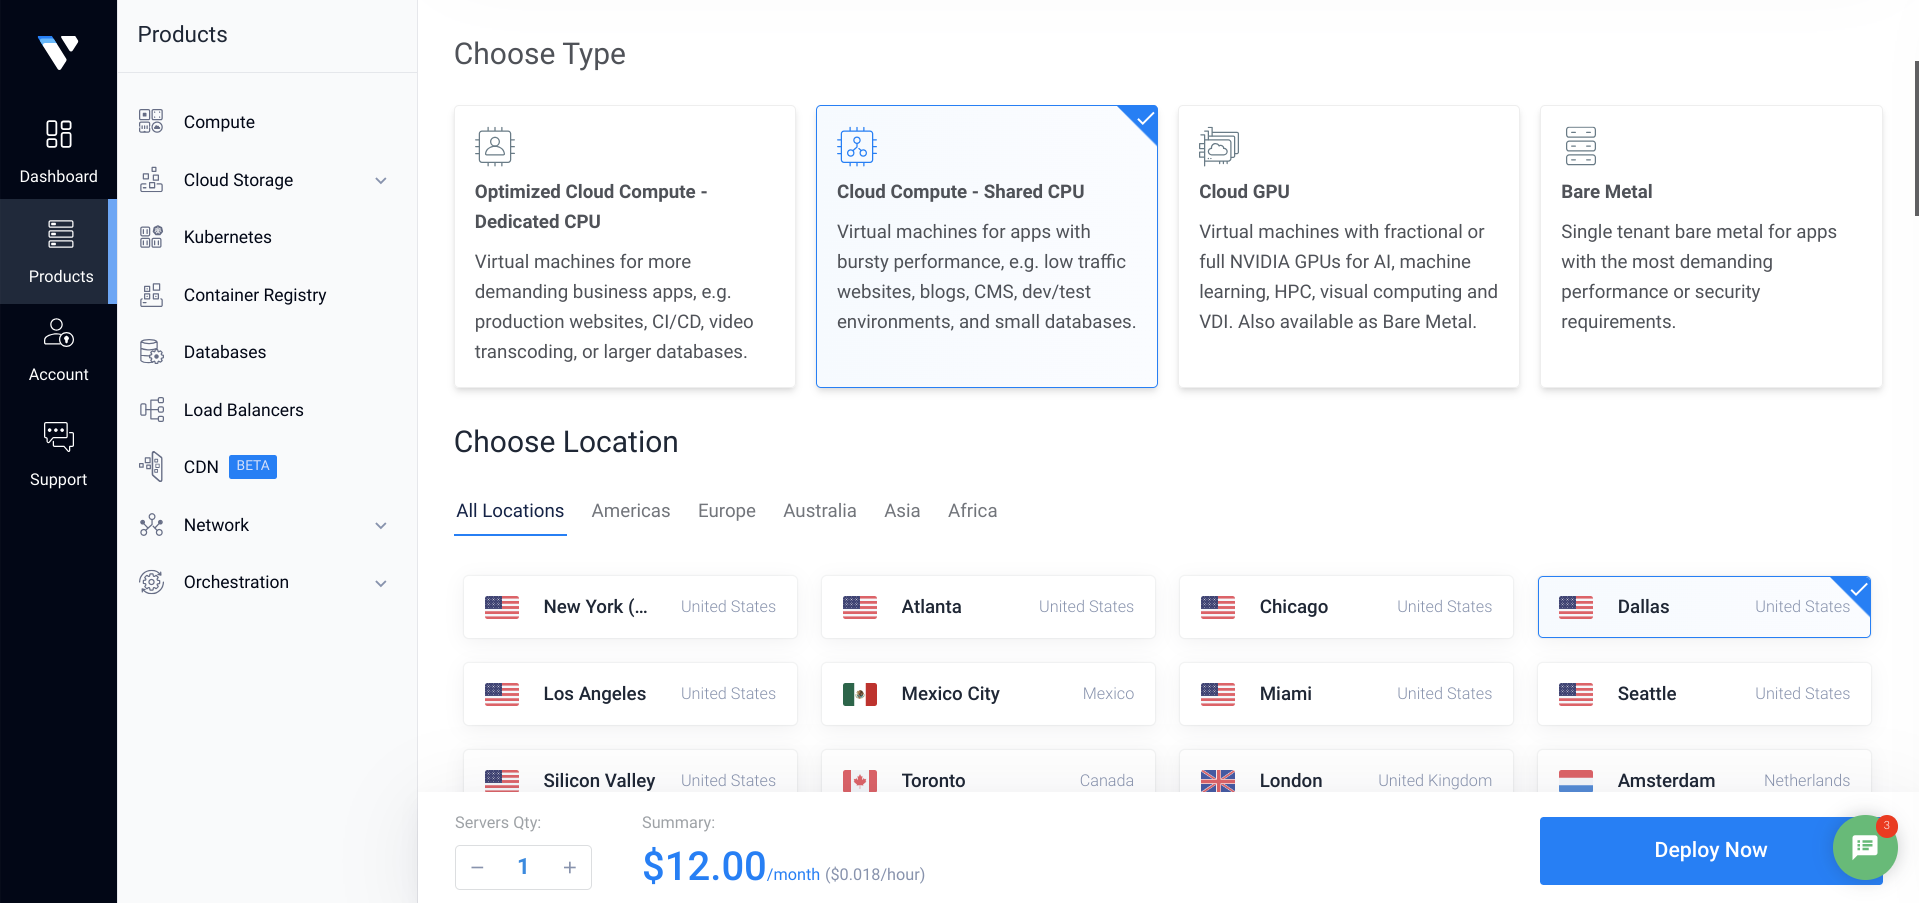
Choose "Shared CPU" as an option, because it's the cheapest and simple websites don't need big processing power.
Choose a location that's close to you.
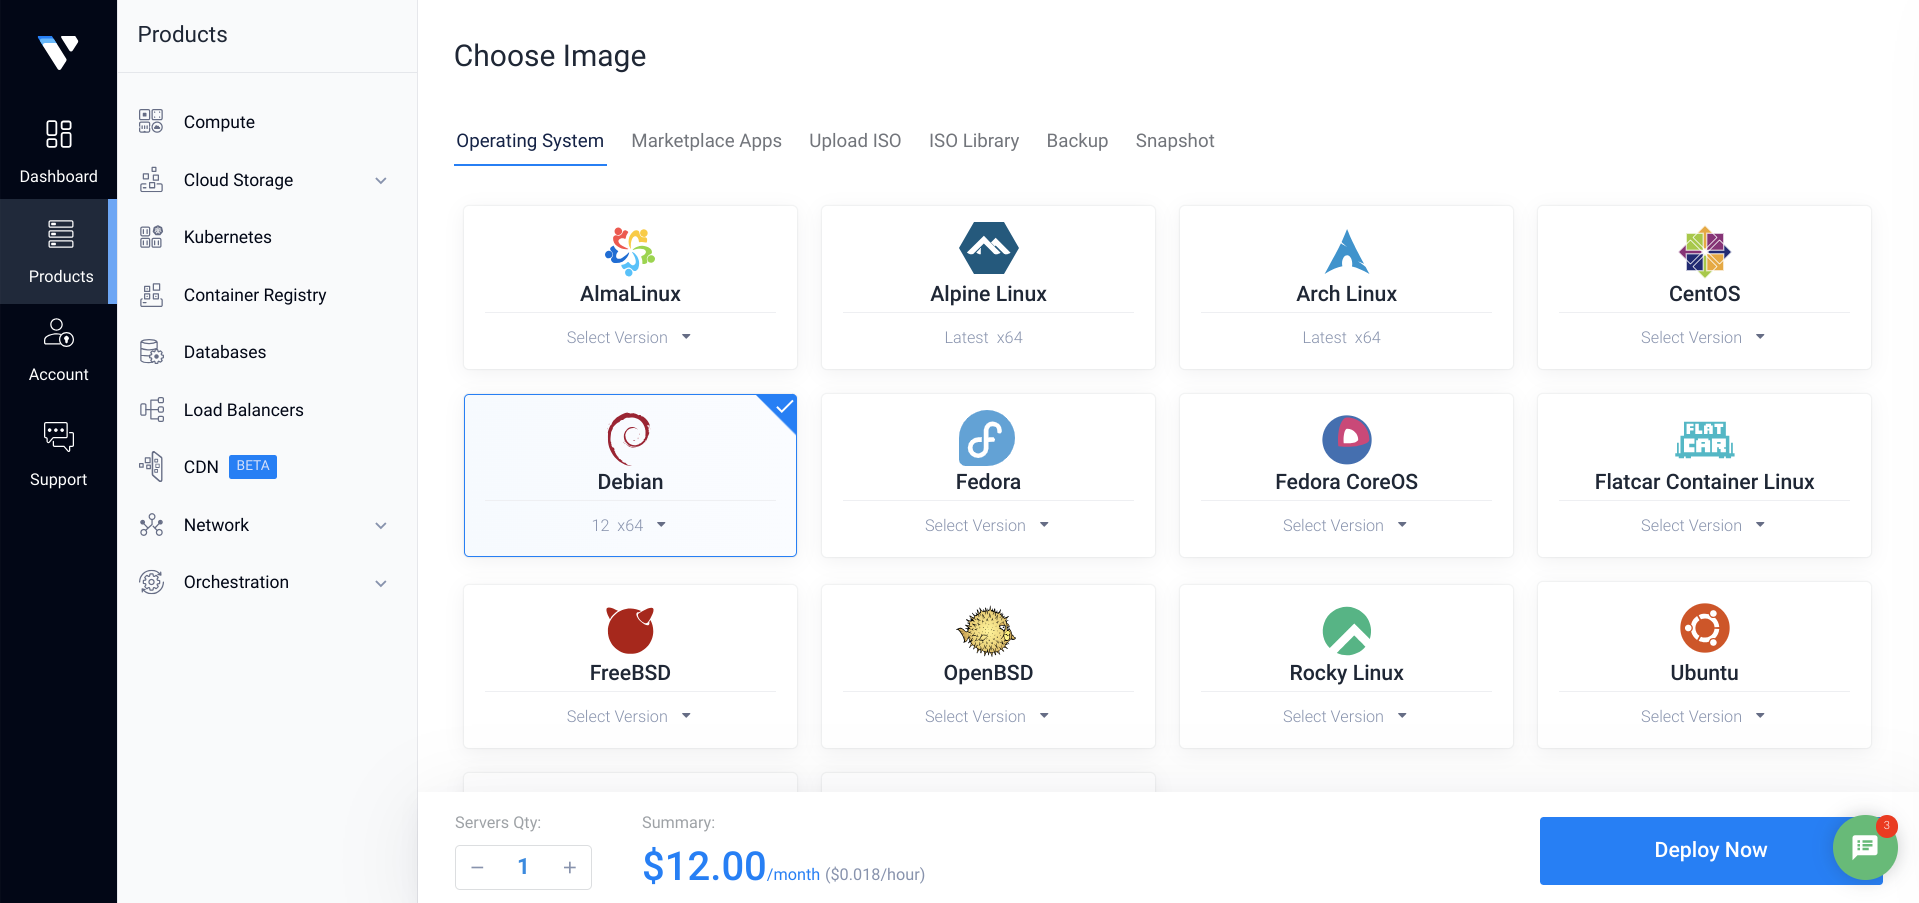
After that you have a variety of "Images" that you can select.
These are installations of operating systems that will automatically be installed once the VPS is deployed.
This can be changed at any time, although it will wipe the server clean when you install something new.
Select Debian, even if you've never used Linux before.
You'll learn the absolute basics today.
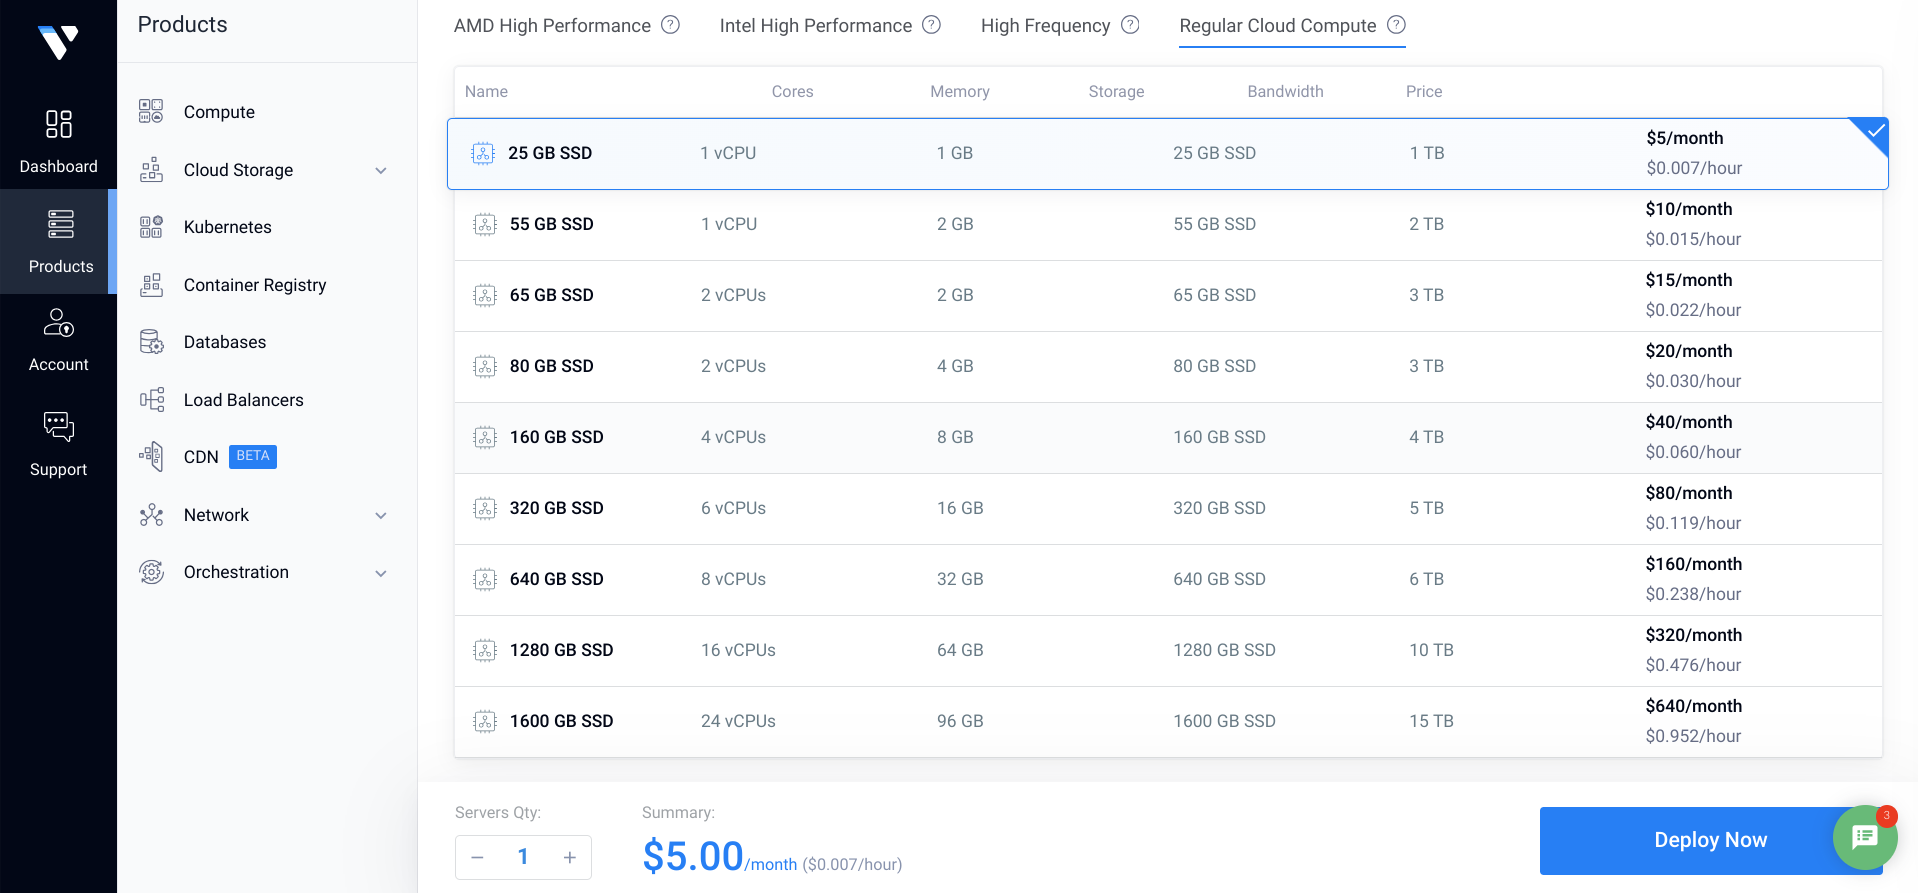
Go to "Regular Cloud Compute" and choose the cheapest option.
You won't benefit from the increased power.
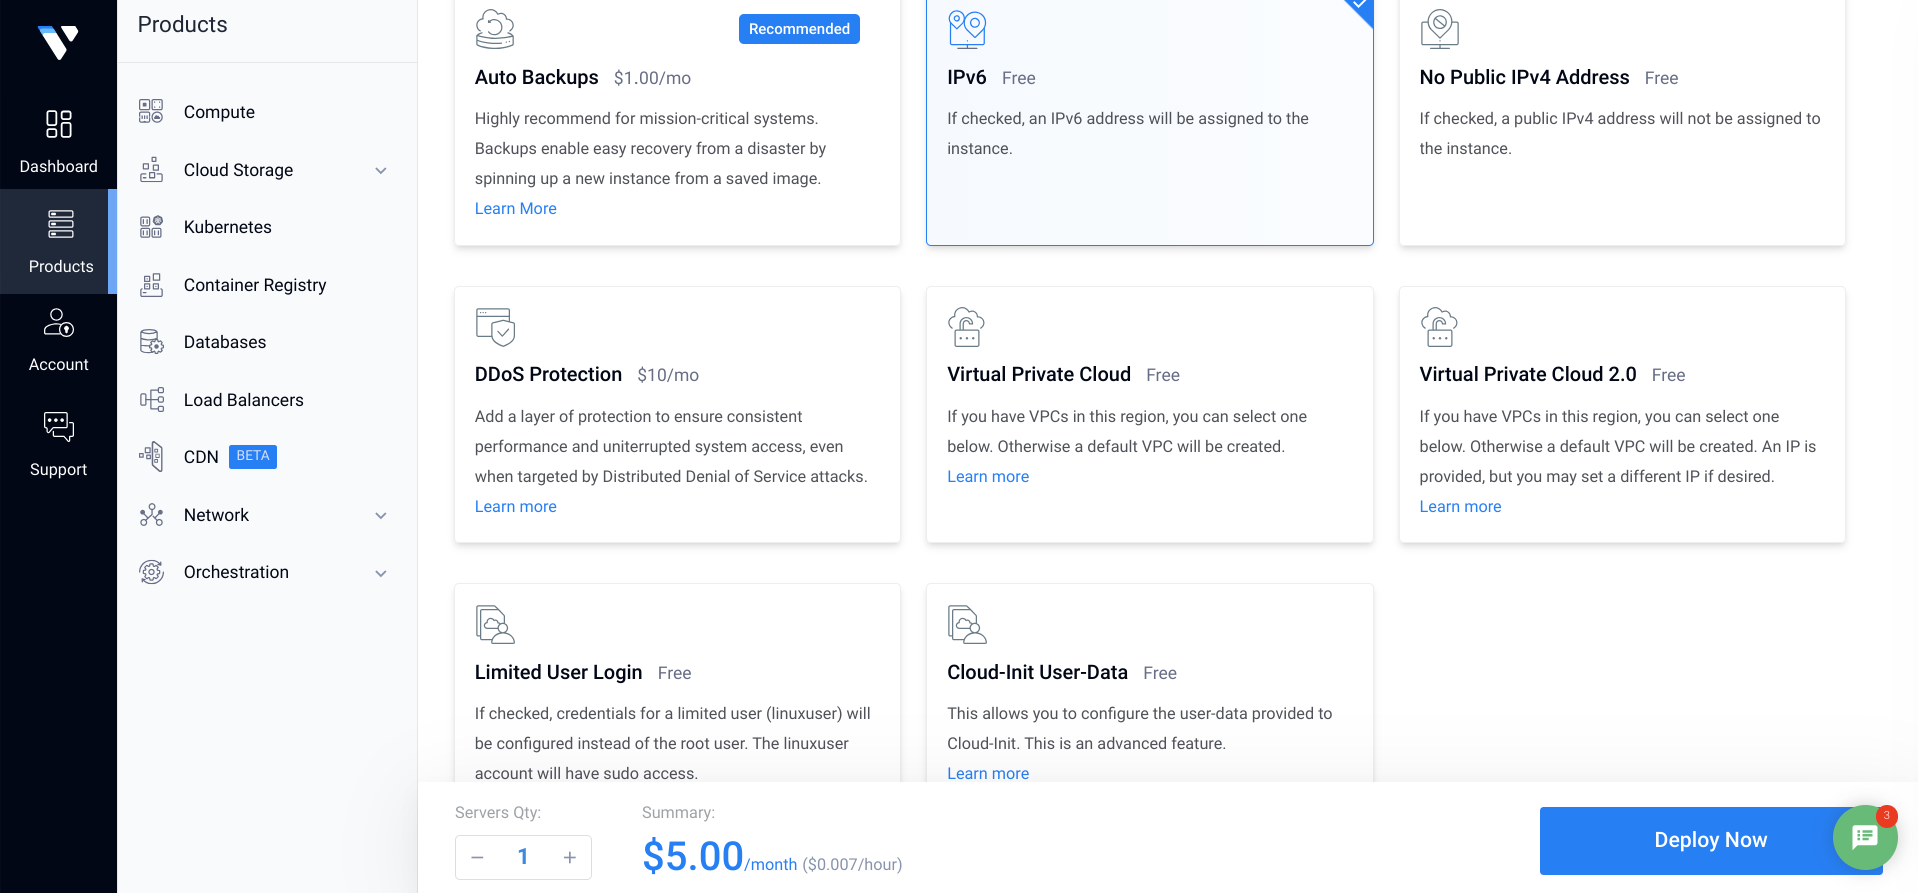
You can turn off auto-backup if you want.
I have it turned off, becauase I have local backups of everything I put up.
It's only a dollar though, so if you want it then you can keep it.
checkmark the IPv6 option, and leave the rest uncheckmarked.
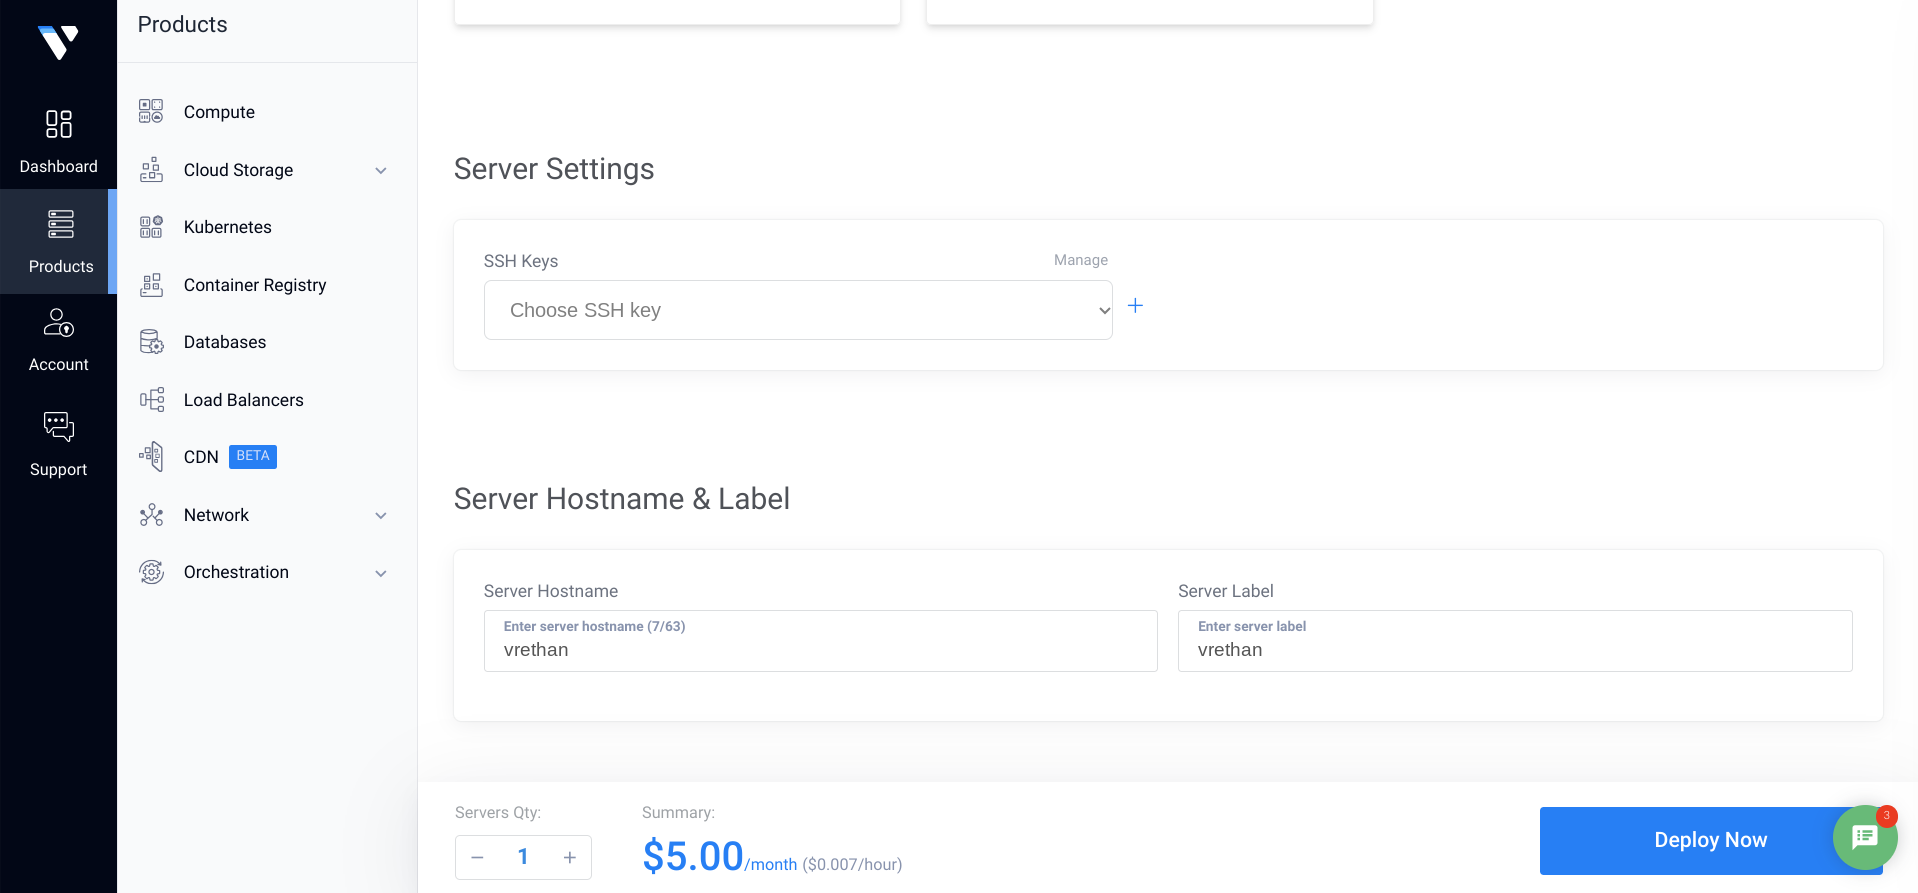
You can ignore the SSH key part, because we're going to generate keys later on.
for hostname and label, put whatever you want.
This is how it'll be named in vultr's settings, so pick a name that's useful to you.
You'll see this name when you log into the server, but you won't see any more of it besides that, and you don't need to remember it.
At the end, click "Deploy".
I already have payment information in, so that was the end of it for me.
You'll be redirected to a cart to pay for it, and then the server will begin installing Debian.
It'll take a minute or so, and then the server will be up and running.
While that's running, we're going to head back to Namecheap.
Part 3: Domain name configuration
The next step we need to do is point your domain name at the server that we just set up.
So click on your new server and copy the IP address.
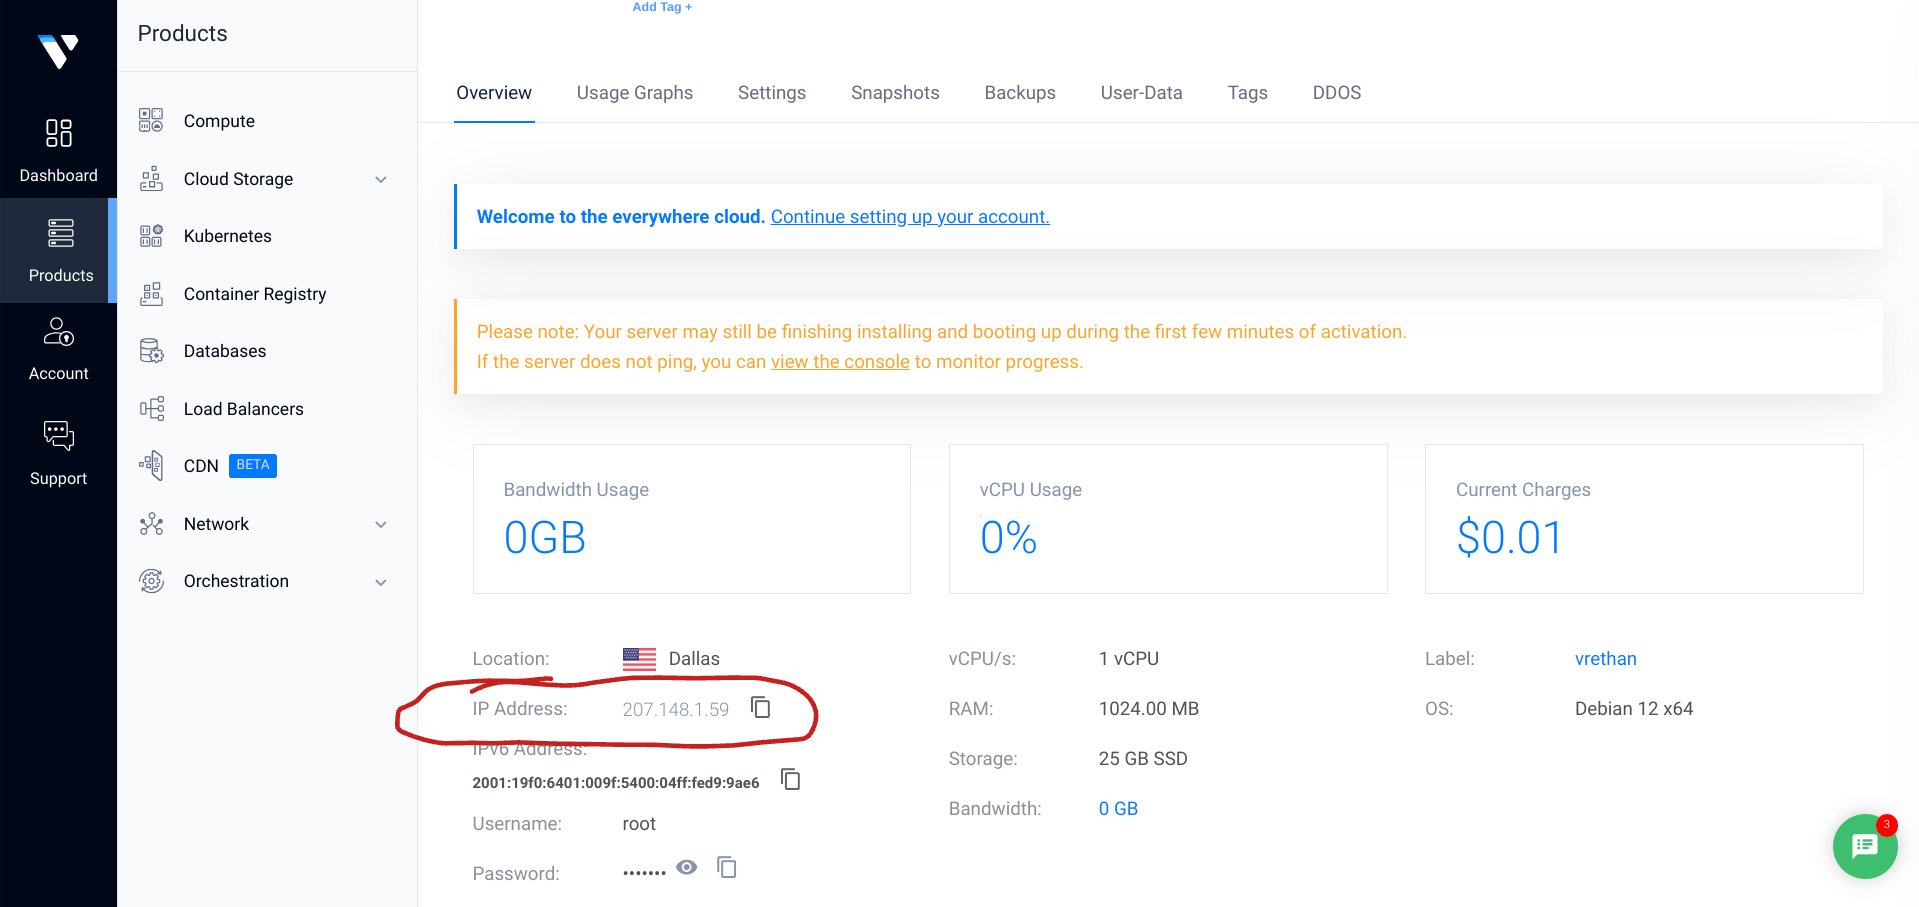
Then, go back to the Namecheap tab that we left earlier.
We need to tell Namecheap that when people go to "leefischer.xyz", to redirect them to 207.148.1.59, which is the IP address of my new server.
So go to your dashboard, and click "Manage" next to your domain name.
Then click on "Advanced DNS".
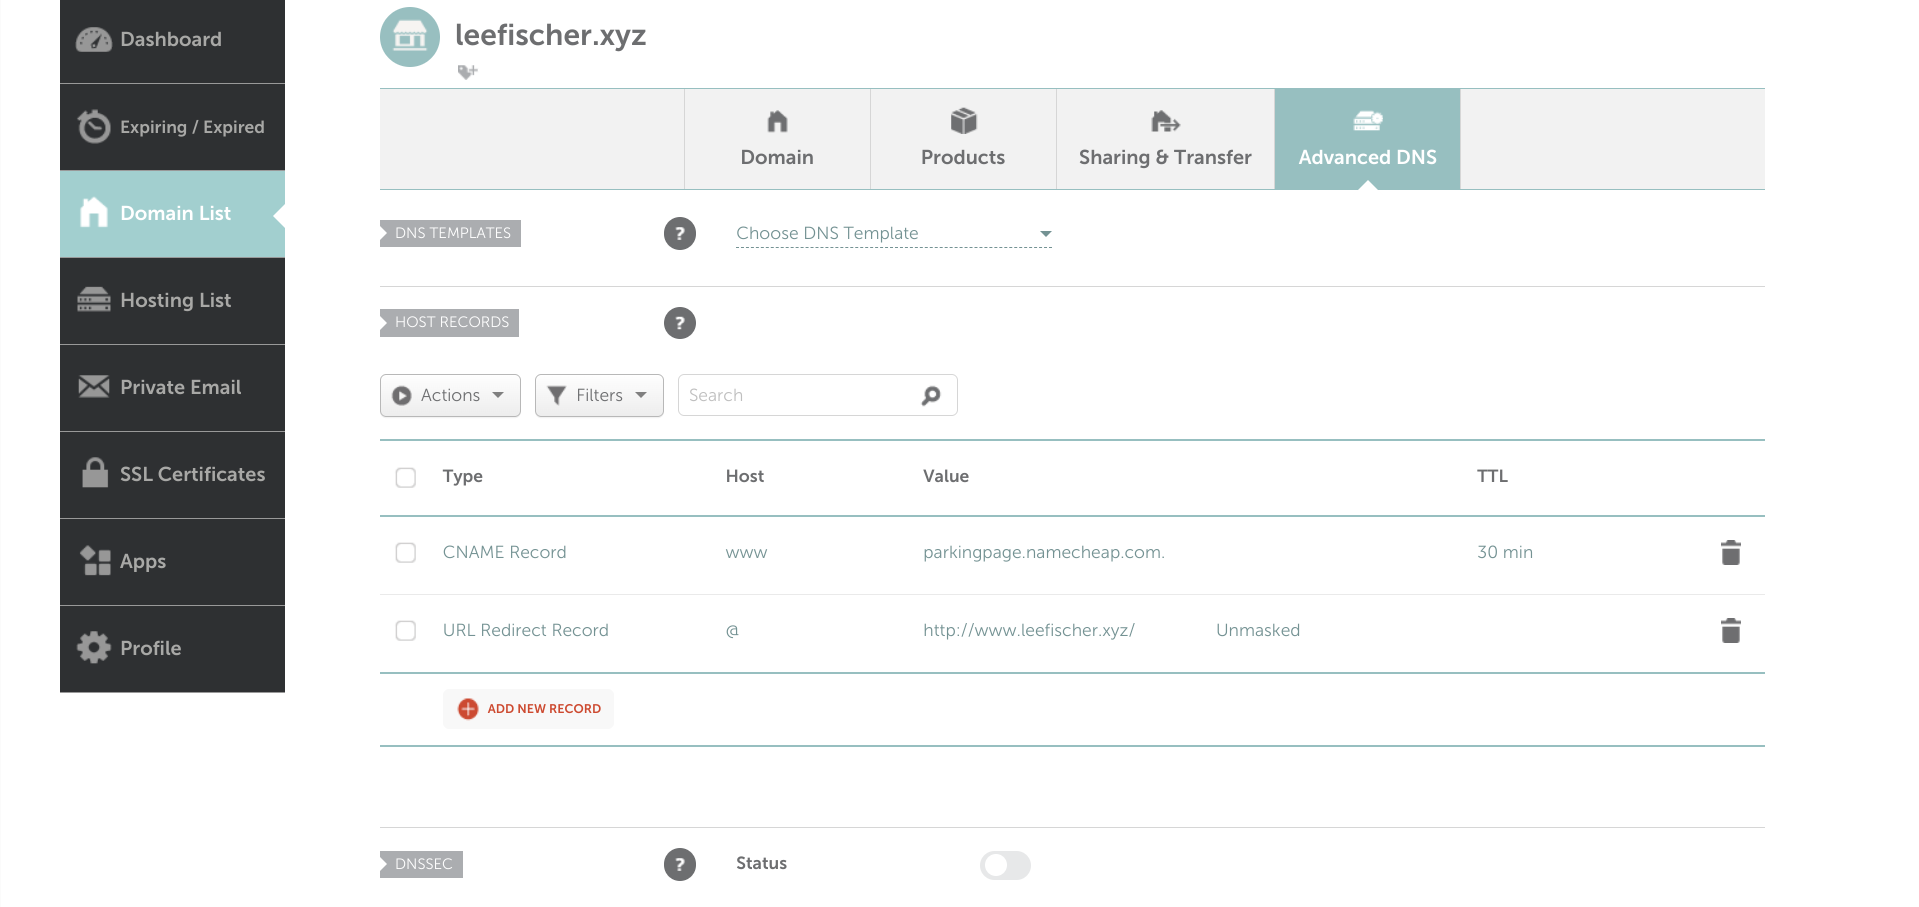
We'll delete both of the current records there, by clicking on the trash bin on the side.
Then, click "Add new record".
select A record, put the "@" sign as the host, then in the value column put the IP address to your server.
Set TTL (Time To Live) as 1 minute, which means that it will update every minute.
Then click the checkmark all the way to the right.
Then, add another new record.
This one will be a CNAME record.
put www in the host column, and then your domain name in the value column.
Set TTL as 1 minute again, and checkmark again.
What this does is make sure that www.leefischer.xyz goes to the same place as just leefischer.xyz does.
It should look something like this when you're done:

Give it a few minutes to propagate that new change.
Sometimes it can take up to half an hour, depending on circumstances.
Just be patient.
When it's done, you should be able to ping your domain name, and the IP address that it sends back is the VPS IP address that we configured.
If you ping the domain name and it isn't that IP address, you need to wait longer.

Part 4: ssh configuration
The next step is adding your ssh key to the server.
This is a key that's specific to your computer, and acts kind of like an ID card.
It appears that Windows does this automatically when you set up OpenSSH, but I cannot verify.
You'll have to figure that part out yourself.
For Chromebook and Linux users, open a terminal and type in the following:
$ ssh-keygen
(note: the $ represents a terminal prompt in code snippets like this.
Don't literally put that in.)
It'll ask for a location, just hit enter and select the default location.
You'll be asked to give an email address and a password.
Give your email address but leave the password blank.
Next, we're going to ssh into the server for the first time. Enter the following:
$ ssh root@(your website.com)
It will ask if you want to fingerprint this key.
Type in 'yes'.
Then it'll ask for the server password.
Go back to the Vultr tab and copy the password, it's right underneath the IP address.
Paste it in, and then you'll be logged in.
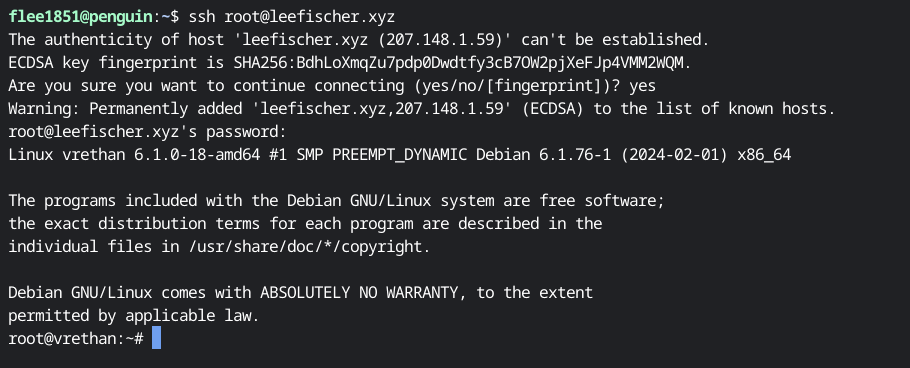
Success!
Part 4.5: Further ssh configuration
Teaching vim is beyond the scope of this guide.
If you have zero experience with it, then this section can be skipped for now.
It's definitely something you want to do, because it makes the server more secure and makes ssh easier.
For starters, we don't want to have to put in the password for the server every time we sign in.
So, we're going to copy our ssh ID to the server.
Close the connection by typing:
$ exit
Now we're no longer logged in, and can use the same terminal to copy our ID.
Type in:
$ ssh-copy-id -i ~/.ssh/id_rsa.pub root@(your website.com)
This copies the key that you just made with ssh-keygen to the server, so that it recognizes it.
You can now log in without giving the password, so do that.
The final step we want to do is set up the server so that only your key can be used to log in.
Even if someone has your password, we're going to set it so that they can't log in.
So, we're going to use vim.
ssh back in and then type the following:
$ vim /etc/ssh/sshd_config
Teaching vim is beyond the scope of this tutorial.
There are a lot of tutorials online to get the basics.
If you're more familiar with nano then you can use that too.
First, comment out the following line by putting a # at the front of it:
Include /etc/ssh/sshd_config.d/*.conf
This option can override changes that we're about to make, so we want to disable it.
Next, search the file for "PasswordAuthentication".
It will be commented out by default.
Change it to the following:
PasswordAuthentication no
Then search the file for "usePAM" and change it to no:
usePAM no
What all of this did was disable password authentication, so no one can log in without having your specific ssh key.
Save and exit the file, and then reload the ssh program on the server:
$ systemctl reload sshd
That's it.
Part 5: Server configuration
Next, we need a few programs so that the VPS functions as a website host properly.
Run the following, in the following order:
$ apt update
$ apt upgrade
this makes sure that the system is fully up to date.
It's probably not necessary given that we just installed Debian, but it's a good practice to get into.
Then, we need to install the following:
$ apt install nginx certbot python3-certbot-nginx
Let it install and then we can start configuring.
We'll copy the default profile for nginx and then make a couple of changes to it:
$ cp /etc/nginx/sites-available/default /etc/nginx/sites-available/(your domain name)
for (your domain name), put your domain name without the TLD.
For mine, it's leefischer.
Then edit that file you just made:
$ vim /etc/nginx/sites-available/(your domain name)
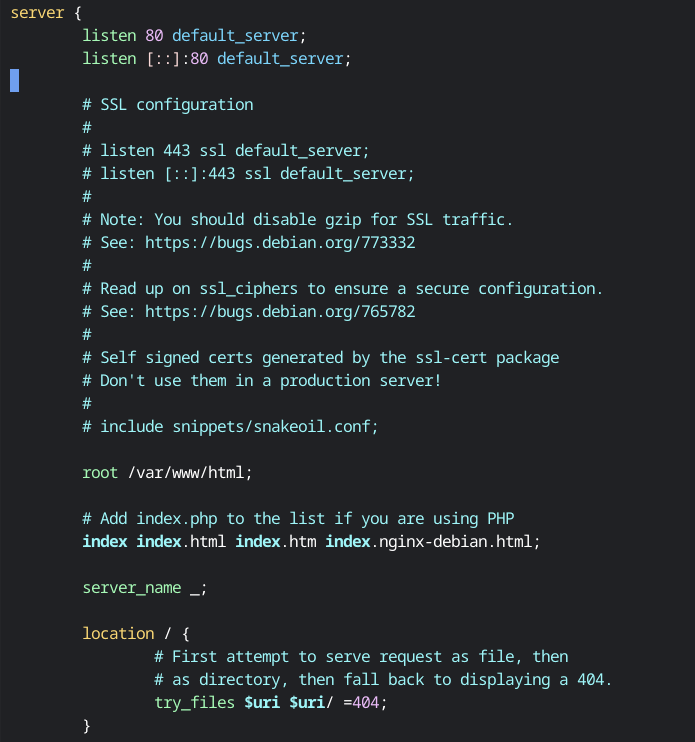
Delete everything with a comment if you want, to clean it up.
Then make the following changes:
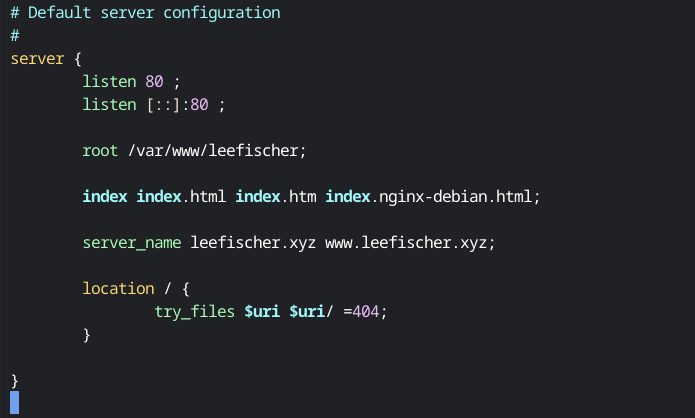
Obviously, replace leefischer.xyz with your website domain name.
Save and quit.
Then we want to symlink that file to sites-enabled:
$ ln -s /etc/nginx/sites-available/(your domain name) /etc/nginx/sites-enabled/
Then, we want to make a directory where your content will go.
$ mkdir /var/www/(your domain name)
That's just your domain name without the TLD, like we put in earlier.
For me, that was leefischer.
Then, we can make an index page, so that when someone goes to your website, they'll find something.
$ vim /var/www/(your domain name)/index.html
Put something simple here, just so that theres a file here.
You can do something like "This is some text" and leave it at that for now.
With that done, we'll set up the firewall and certbot properly.
Reload nginx with the following:
$ systemctl reload nginx
Certbot is the program that allows us to get https instead of just http.
We need to open up the server for them:
$ ufw allow "Nginx Full"
$ ufw allow "Nginx HTTP"
Then run:
$ certbot --nginx
It will ask for your email, so sign up.
You can skip the newsletter.
It will then ask which names you want to activate HTTPS for.
type in "1 2" and hit enter.
Allow it to run and then it should deploy successfully.
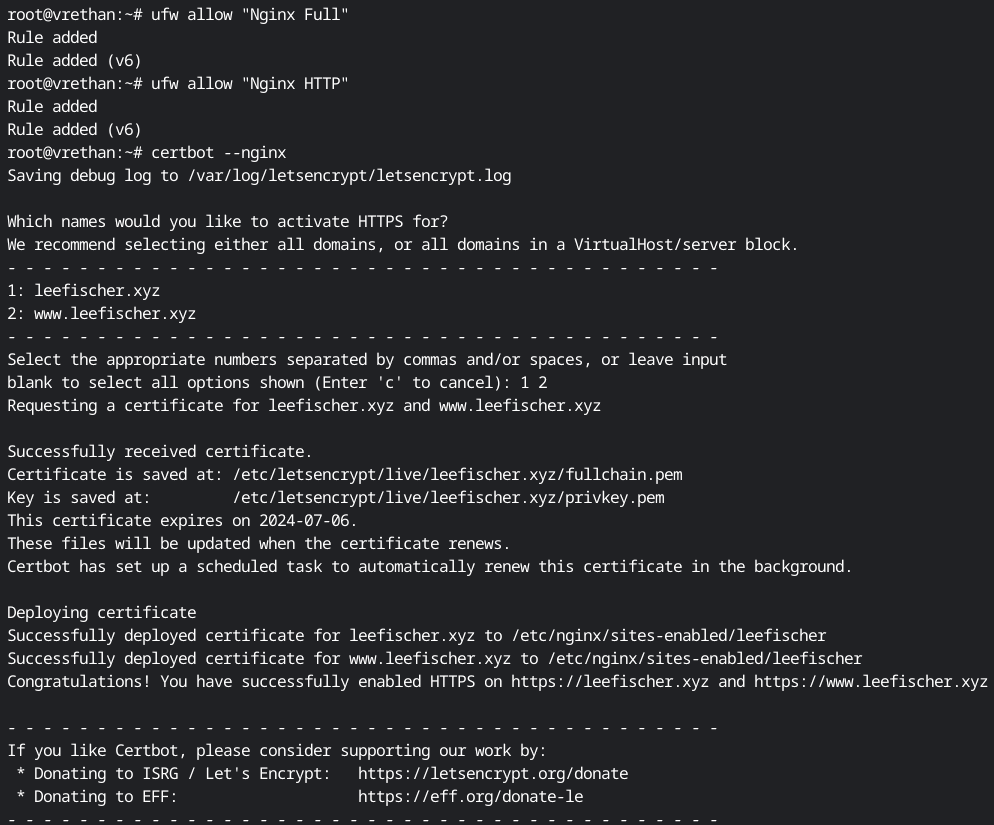
Finally, go to your browser and type in your url.
Assuming everything was done correctly, you should now have a website.

Part 6: Where to go from here
That's it.
You have a website now, from start to finish.
The next steps to take is to start putting your content up, such as creating webpages and uploading pictures.
You could also start styling the website with css, so that it's not a black-on-white eyesore.
That is beyond the scope of this guide.
Luke Smith on Youtube has a great video on it, which you can find here.
Good luck.
Back to index


 Go to the cart, and make sure that "Domain Privacy" is selected.
It's free, and it means that all of the personal information you gave when you signed up will remain private.
Confirm order, and pay for it.
After the payment goes through, you'll see a button to manage the new domain name.
Click it, and leave that tab open.
That's it on Namecheap for now, so let's go get our server set up.


